Here is the process which I’m guessing you need to follow for Trusted Signing (FAQ)
It’s from memory, and I had a LOT of mis-steps along the way so please help me to refine these steps
I started from scratch, Create a new email (forwarder)
Create a new Microsoft Account (MSA)
- make sure to add a phone number
but do NOT add it as an alternate number
Create an Azure Account using the new MSA
- https://portal.azure.com (I’ll just call this azure in the future)
I went in and added some indenty information about the new user
I have no idea if this matters.
GENERAL TIPS on the Azure Portal:
-
Some UI opens a modal window, there will be a little x in the upper right corner
that you can use to close (back out of) the window -
Often buttons are disabled
I’m told that sometimes it helps to logout and back in again
it would be nice if they explained why a button is disabled, but no.
Azure Portal
-
Trusted Signing Accounts
 Create
-
Project Details:
- Resource group
- Create New
Give it a name
I appended -RG to the end of my name to indicate it’s a Resource Group
for this walkthrough I’ll call it LearnTrustedSigning-RG
- Create New
- Resource group
-
Instance Details:
-
Account name:
Click on the button for restrictions in naming
I believe this name must be globally unique
this is the name that will be passed into signtool when you want to sign
For this walkthrough I’ll call it LearnTrustedSigning-Instance -
Region
note: I don’t believe that all regions in the world support trusted signing yet
I assume that all mentioned in the drop down do support it
note: the Region you select here, will alter the endpoint passed into signtool -
Pricing Tier
see https://azure.microsoft.com/en-us/pricing/details/trusted-signing/
I used Basic
-
-
NEXT BUTTON takes you to Tags
I didn’t add any tags -
NEXT BUTTON takes you to Review and Create
-
-
At some point, I was asked to add something to hold secrets
- I don’t recall where that was
I was likely lead there by an OVERVIEW pane somewhere
maybe that was the Resource Group mentioned above -
Now go into your new Trusted Signing Account - LearnTrustedSigning-Instance
- Access Control (IAM)
- Add
- Leave it on Tab[ Job function roles]
- Search for “Trust”- Select “Trusted Signing Identity Verifier”
- Press NEXT
- Select Members
Select yourself, the Global Administrator
(you can select mutliple users here, if you have multiple users
note: later I will add another “internal” “organizational” user
which is used for the actual signing - PRESS SELECT
- PRESS Review + Assign
- Leave it on Tab[ Job function roles]
- Access Control (IAM)
-
Back on Home → LearnTrustedSigning-Instance
- PRESS Identity validation
-
New Identity
Select Public or Private – I selected Public
 NOTE they are expecting a website with https://
if that’s an issue for you, please solve that first-
NOTE: the business identifier is pre-selected to duns number
I you don’t have a dun and bradstreet number
or it has outdated information (our duns had an old address)
then select a different way to identify your business
I used a Tax Id and used our EIN -
from prior experience with Sectigo (Comodo)
carefully fill out the New Organization validation form
make sure it’s 100% accurate
down to each comma and apostrophe -
PRESS Create
-
Check Email - find the email, and verify the email
-
Wait for them to complete the identity validation
ours took about 30 minutes !!!
the subject of the email was: “Trusted Signing identity validation status”
-
-
- PRESS Identity validation
-
Once validated
-
Azure > Trusted Signing Accounts > LearnTrustedSigning-Instance
- press Certificate profile
Create-
There are several types
Public: Public Trust| VBS Enclave|Public Trust Test
Private: Private Trust| Private Trust CI Policy
I chose Public Trust-
Fill in the form
sorry I can’t open the form right now as the Basic subscription allows only 1 certificate profile-
You’ll give the certificate a name
this name will be passed to Signtool
Let’s call ours LearnTrustedSigning-CertOther fields will include the name of your Organization
and a street or postal address
-
-
PRESS Create
-
-
-
Click on “Microsoft Azure” upper left to go “Home”
- Click On Microsoft Entra ID
(you may need to click on All Services first)
(later Entra ID is shown as Home > Default Directory)- Click on Manage > Users
- New user
Create new user (to create a new internal user in your organization)
it will need an email address that does NOT match an existing user that Azure knows about
I created a new email forwarder for this- fill out the rest of form including display name and password
note the password will need to be replaced shortly
- I think it might be important to fill in the phone number
as later you’ll be asked to use the microsoft authentication app on your phone - save your login and password to your password database (of course)
- Press Review+Create
- fill out the rest of form including display name and password
- Click on Manage > Users
- Click On Microsoft Entra ID
-
Click on Home
-
Click on Trusted Signing Accounts
- Click on LearnTrustedSigning-Instance (so it shows Home > LearnTrustedSigning-Instance at the top)
- Access Control (IAM)- Add (add role assingment)
Leave it on Tab[ Job function roles]- Search for “Trust”
- Select “Trusted Signing Certificate Profile Signer”
- Press NEXT
- Select Members
- Select the new internal user we just created
FYI: you can select mutliple users here, if you have multiple users - PRESS SELECT
- PRESS Review + Assign
- Select the new internal user we just created
- Search for “Trust”
-
Now… it’s time to switch to downloading SignTool and the extra things it needs
see notes inside of my CallCodeSign.cmd batch file
which appears at the bottom of this post-
see Set up signing integrations to use Trusted Signing | Microsoft Learn
-
to get the tools you need:
-
  from admin powershell
  cd to desired folder to install your tools
  PS C:\> Invoke-WebRequest -Uri https://dist.nuget.org/win-x86-commandline/latest/nuget.exe -OutFile .\nuget.exe

 .\nuget.exe install Microsoft.Windows.SDK.BuildTools -Version 10.0.22621.3233 -x
 .\nuget.exe install Microsoft.Trusted.Signing.Client -Version 1.0.53 -x

while I used the call above, it's probably a good idea to check which version is preferred

If you want to live dangerously go for the latest version --v
 .\nuget.exe install Microsoft.Trusted.Signing.Client -Version *
- your json file will look like this, examples call this the metadata.json file
       {
            "Endpoint": "https://eus.codesigning.azure.net",
            "CodeSigningAccountName": "LearnTrustedSigning-Instance",
            "CertificateProfileName": "LearnTrustedSigning-Cert",
            "CorrelationId": ""
        }
- note the endpoint will be different if you used a different region than East US
to check your region, Azure > LearnTrustedSigning-Instance > Overview > location
see url in the batch file for see a list of pairs of regions and endpoints
- To sign a file
-
make sure you have .NET 8 Installed
-
from the same folder as the CallCodeSign.cmd
C:.…> CallCodeSign TheFilesToSign
Note: TheFilesToSign can be one file, or a list, can can use wild cards -
Now, the first time you call SignTool with this configuration
-
a browser tab will open, and you’ll be asked to login
Select the Internal user we created towards the end of our process
and fill in the password
at this point it said since this is the first time logging in
that I needed to change the password
do, so, and save your password to your password database (of course) -
THEN It wanted to have me add the user to the Microsoft Authenication app on my phone
Open the App on your phone
Press + at the top
Select Work or school account
Scan the QR code on your screen- At some point you’ll probably need a thumbprint
Then they wanted to test the authenticator
select (or maybe it was type) the number on the screen in the browser into the app
and press approve
- At some point you’ll probably need a thumbprint
-
-
If I recall correct, that first code sign failed
-
Try it again, and it worked for me
-
Find someone to celebrate the hard fought victory

-
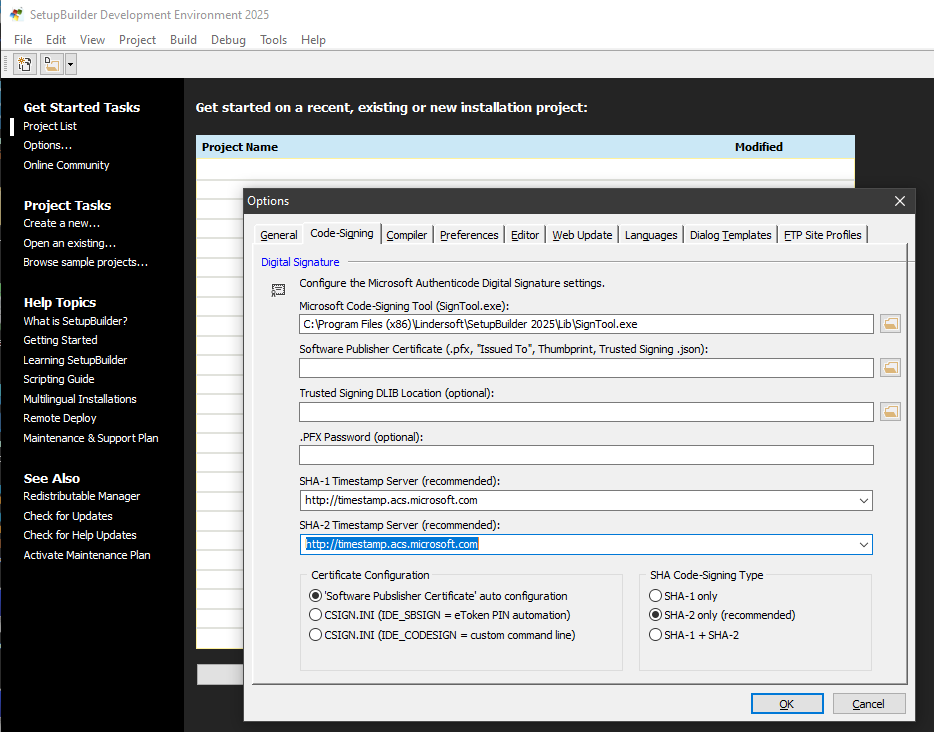
see this clarionHub topic for notes on how to use Microsoft Trusted Code Signing with SetupBuilder prior the SetupBuilder 2025 which Friedrich said should be released February 6, 2025
CallCodeSign.cmd —v
:: Created 2025-Jan-22 by Mark Goldberg

@IF .%1.==.. Goto Error

Set SignTool=".\Microsoft.Windows.SDK.BuildTools\bin\10.0.22621.0\x64\signtool.exe"
Set dlib=".\Microsoft.Trusted.Signing.Client\bin\x64\Azure.CodeSigning.Dlib.dll"
Set JsonConfig=".\metadata.json"

%SignTool% sign /v /debug /fd SHA256 /tr "http://timestamp.acs.microsoft.com" /td SHA256 /dlib %dlib% /dmdf %JsonConfig% %*

:: verify is optional
:: %SignTool% verify /v /debug /pa %*

@Goto Done

:: NOTES: ============================================
:: see https://learn.microsoft.com/en-us/azure/trusted-signing/how-to-signing-integrations
::
:: to get the tools you need:
::   from admin powershell
::   cd to desired folder to install your tools
::     PS C:\> Invoke-WebRequest -Uri https://dist.nuget.org/win-x86-commandline/latest/nuget.exe -OutFile .\nuget.exe
::
::     .\nuget.exe install Microsoft.Windows.SDK.BuildTools -Version 10.0.22621.3233 -x
::     .\nuget.exe install Microsoft.Trusted.Signing.Client -Version 1.0.53 -x
::
:: while I used the call above, it's probably a good idea to check which version is preferred
:: If you want to live dangerously use -Version * to get the latest version
::  .\nuget.exe install Microsoft.Trusted.Signing.Client -Version *
::
::
:: contents of the file pointed to by %JsonConfig%
:: {
::     "Endpoint": "https://eus.codesigning.azure.net",
::     "CodeSigningAccountName": "<replace with the name of your Trusted Signing Account>",
::     "CertificateProfileName": "<replace with the name of your Certificate Profile>",
::     "CorrelationId": ""
:: }
::
:: "Endpoint":choose the Endpoint URI value that matches the region you selected when you created the Trusted Signing account that you'll specify next (CSAN)
::    https://learn.microsoft.com/en-us/azure/trusted-signing/how-to-signing-integrations#:~:text=Region%20class%20fields-,Endpoint%20URI%20value,-East%20US
::
:: "CodeSigningAccountName":
::   is the (globally unique) name you gave your Trusted Signing Account
::   portal.azure > trusted signing accounts > use the name from an item in this list (I only have one)
::
:: "CertificateProfileName"
::   portal.azure > trusted signing accounts > click on the name selected above > certificate profile > use the name from an item in this list (I only have one)

:Error
@Echo ===================================================
@Echo ERROR: You must pass in the file(s) to sign
@Echo wild cards are acceptable
@Echo ===================================================

@Goto Done

:Done